|
|||
LightScribe Frequently Asked QuestionsTo view the answer to a particular question, simply click the question; to hide the answer, click it again.
From SureThing CD/DVD Labeler, go to the File menu, click on New and choose LightScribe. If LightScribe is not showing up and you have a LightScribe drive, then download and install the LightScribe system software (LSS) and it will show up. Click here to get the latest version.
Either you do not have a LightScribe drive or the LightScribe system software is not installed or functioning correctly. Download and install the latest LightScribe system software (LSS) and try it again. Click here to get the latest version.
For errors such as: Communication error, Please be sure there is a LightScribe disc in the drive,
LightScribe Engine Error, etc.
In the world of LightScribe, the terms “print” and “burn” are often used interchangeably for the simple reason a LightScribe drive uses the same laser to write (burn) data that it uses to print (burn) labels. The difference being which side of the disc gets burnt. Hence the LightScribe motto, “Burn, Flip, Burn.” As an aside, it doesn’t matter which burn is first. In other words, you can burn the data first or you can burn the label and burn the data later.
To burn a label using SureThing CD/DVD Labeler, click Print Design in the Actions panel on the left, or go to the File menu and select Print. Under Print Using choose LightScribe drive. You will be prompted to insert a LightScribe disc with the label side facing down.
There are a few things that determine how long a LightScribe disc will take to burn a label. From LightScribe’s website: “Labeling time depends heavily on content, hardware, media and print mode used. Typically for title only content, a labeling time of 2-5 minutes can be expected. For full disc graphics in Best quality mode, labeling times of 20-35 minutes can be expected.”
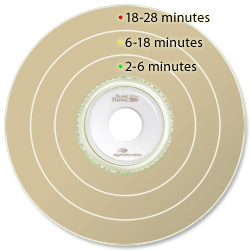
Ultimately, the time it takes is a factor of the speed and amount of print. The more there is to print, the longer it will take. Certain drives and connection types are faster than others. Also your quality/contrast level settings will effect the time. Generally, we’ve found this diagram to be useful tool when estimating the amount of time:  The LightScribe laser burns in concentric circles from the center of the disc to the outside. If you want a fast burn, restrict your label content within the first circle (SureThing’s Circular Text tool makes this very easy). If your design includes text and graphics that span the entire surface of the disc, from center to edge, expect longer print times.
You can place text and images in the outer regions and print in a shorter amount of time provided the inner regions do not also contain text and graphics.
LightScribe prints from the inside of the disc to the outside. Meaning the further out the text or image, the longer it will take. SureThing’s Circular Text tool works better than Text Frames (horizontal text). Also using layouts such as “Simple Title” and “Simple Contents” that constrain the content to the innermost ring will help. You can choose your layout via the horizontal Layout bar at the bottom-middle of the screen.
See “How long does it take? Why does LightScribe take so long?” for more info.
At the bottom-right hand corner of your screen you will see an icon for the SureThing Print Manager when printing. Open this to view your progress. The Print Manager is your friend. It allows you to work on other projects while your LightScribe disc is printing. The Print Manager (see below) is only displayed when printing:
Yes, with SureThing v5.2 you can. Go to the File menu, click on Print, click the down arrow under Drive, and choose Multiple Drives. SureThing will distribute prints across however many drives are selected by how many designs/copies there are. Click here to read more about this feature.
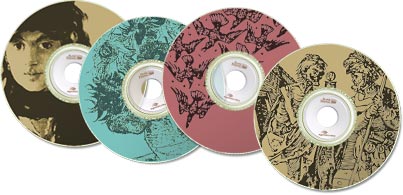
LightScribe only supports printing black and various shades of gray. Any color images and text in your design will print, but the color will be converted to monochrome and de-saturated. There currently isn’t a “color” LightScribe drive, per se, although LightScribe discs are available in various colors. But even with colored discs, your LightScribe drive is still burning only black and shades of gray.

Most PC electronic stores carry LightScribe drives and media. You can also buy
LightScribe media direct from SureThing.com.
To insert a background, go to the Backgrounds panel (on the left side of SureThing’s main window) and click on Select Background. At the bottom left, you might have to click the button for Custom Background. Browse to the directory that has your images. Select an image and hit OK. If you do not know where the image(s) are you can have SureThing search for them by clicking on the “Search Folder” button:
 To insert a picture, go to the Pictures/Clipart panel on the left and click on Browse for Pictures/Clipart to browse to the directory that has your images. Select an image and hit OK. If you do not know where the image(s) are you can have SureThing search for them by clicking on the “Search Folder” button.
The label gallery
designs from lightscribe.com are zipped (.zip) jpg images. Save them to your computer and unzip them. Open SureThing, go to the Backgrounds panel on the left and click on Select Background. At the bottom left, you might have to click the button for Custom Background. Then browse to the directory where you saved the jpg images you unzipped. Select an image and hit OK.
This is a feature of SureThing v5.2 that lets you design and edit your LightScribe disc in a view representative of the way it will look when printed. You will seed the “gold” of the disc surface, and your images/text are displayed in monochrome (black and shades of gray).
To turn this on/off, go to the View menu and toggle LightScribe Preview Mode. Click here to read more about this feature. |
LightScribe Essentials:
|
||||||||||||||
SureThing Home | Privacy Policy | Contact Us
Copyright © 2009 MicroVision Development, Inc. All rights reserved.


